| Introduction |
|
| This document is one of a series of tutorials
to demonstrate the use of the Web Services tools in the Web Tools
Platform Project using the WTP drivers (it works with WTP 1.5.x, WTP
2.0.x, WTP 3.0.x, and WTP 3.2). |
| This tutorial shows how to create a simple Web
service and Web service client from a Java class. The Java class in
this scenario converts between the Celsius and Farenheit temperature
scales. |
|
Set Up |
Tomcat Installation
|
|
- If you do not have Apache Tomcat on your machine,
you will
first need to download and unzip Apache Tomcat
(this scenario was written using Apache Tomcat version 5.0.28, but
other versions can be substituted).
- Start the Eclipse WTP workbench.
- Open Window -> Preferences -> Server
->
Installed Runtimes to create a Tomcat installed runtime.
- Click on Add... to open the New Server
Runtime
dialog, then select your runtime under Apache (Apache Tomcat
v5.0 in this example):

- Click Next , and fill in your Tomcat
installation directory :

- Ensure the selected JRE is a full JDK and is
of a
version that will satisfy Apache Tomcat (this scenario was written
using SUN JDK 1.4.2_06). If necessary, you can click on Installed
JREs... to add JDKs to Eclipse.
- Click Finish .
| Create
a Dynamic Web Project |
- Open File -> New -> Other... ->
Web -> Dynamic Web Project to create a dynamic Web project.
- Click Next .
- Enter the name of the Web project into the Project
Name field.
- Proceed to one of the following steps:
- No server runtime installed.
If you have not previously configured a
server runtime, use the New... button beside the Target
runtime field to do so.
- Target runtime already installed
If you had previously installed a Tomcat 5.0
or Tomcat 5.5 server runtime, use the drop-down box to select the
runtime. Then click Finish .

|
|
|
|
Creating a bottom up
Java bean Web service and Web service client |
- Import the wtp/Converter.java class into ConverterProj/src
(be sure to preserve the package).
- Select the Converter.java file.
- Open File -> New -> Other... -> Web Services
-> Web Service.
- Click Next.
- Move the Service slider to the Start Service
position .
- Move the Client slider to the Test Client position
.
- Select Monitor the Web service .
- If you want to choose a server different from the one
defaulted by the wizard, click the Server project link to select a server .
- Result:
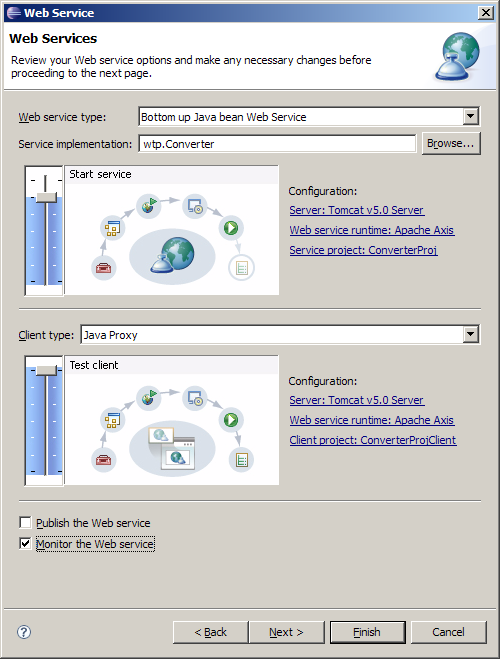
- Click Finish .
- It will take about one minute for the wizard to assemble
the Web service and Web service client Web projects, start Apache
Tomcat, and deploy the projects to Tomcat. Once finished, the generated
Sample JSP Web application will appear in the browser view, maximized
here for clarity:
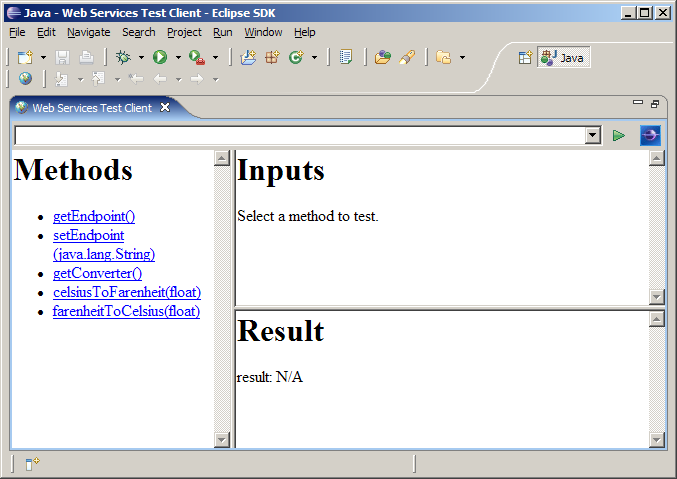
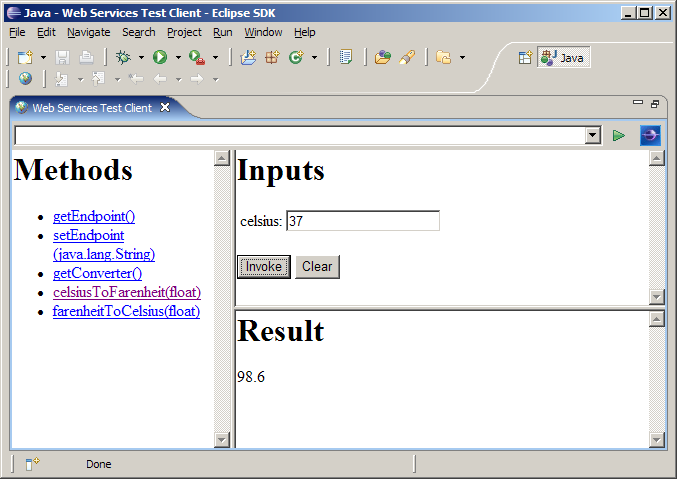
- Under Methods , click on celsiusToFarenheit(float)
.
- Under Inputs , enter 37 into the celsius
entry field.
- Click on Invoke. In the Result view, you
should get a response of 98.6.
- Since you selected the "Monitor Web service" checkbox, a
TCP/IP port is automatically created on the Tomcat server. When you
invoke the Web service, the TCP/IP Monitor view comes up
automatically showing the SOAP message request and response.
Double-click on the TCP/IP Monitor view and select XML view in
the drop-down combo for both request and response. Result:

|
|
Explanation
|
| The Web Service wizard is orchestrating the
end-to-end generation, assembly, deployment, installation and execution
of the Web service, Web service client, and sample JSPs. In this
scenario, we clicked Finish on page one. In effect, this is allowing
the wizard to pick reasonable defaults according to the basic
high-level choices made on the first page. If you repeat this scenario,
but use the Next button to work through the wizard, you will learn more
about the kinds of choices that are available and the kinds of defaults
being assumed. |
| After completing this scenario, the WSDL for
the Converter Web service can be found in ConverterProj/WebContent/wsdl/Converter.wsdl.
|
| Now that your Web service is running, there are
a few interesting things you can do with this WSDL file. Examples: |
- You can double-click on the WSDL to open the WSDL
graphical editor.
- You can right-click on the WSDL and choose Web
Services -> Test with Web Services Explorer to test the
service.
- You can right-click on the WSDL and choose Web
Services -> Publish WSDL file to publish the service to a public
UDDI registry.
- You can click on the WSDL and choose New ->
Other... -> Web Services -> Web Service Client to generate a
Web service client. Note, however, that we have already witnessed the
internal and visual features of the Web Service Client wizard since, in
addition to being its own wizard, it is quite literally embedded within
the larger Web Service wizard.
|


